Let's get animating!
Welcome! In this article we're going to cover GSAP's core fundamentals and animate some HTML elements. 🥳
If that's not your end goal, don't worry. Whatever you plan to animate, whichever framework you use - the techniques and principles covered here will serve you well.
What is "GSAP"?
The GreenSock Animation Platform (GSAP) is an industry-celebrated suite of tools used on over 11 million sites, including a ton of award‑winning ones! You can use GSAP to animate pretty much anything JavaScript can touch, in any framework. Whether you want to animate UI, SVG, Three.js or React components - GSAP has you covered.
The core library contains everything you need to create blazing fast, cross-browser friendly animations. This is what we'll be stepping through in this article.
In addition to the core, there are a variety of plugins. You don't need to learn them in order to get started, but they can help with specific animation challenges like scroll based animation, draggable interactions, morphing, etc.
Creating an animation.
Let's start by animating an HTML element with a class of "box".
gsap.to(".box", { x: 200 })
A single animation like this is called a 'tween' This tween is saying "hey GSAP, animate the element with a class of '.box' to an x of 200px (like transform: translateX(200px))".
loading...
Let's take a closer look at the syntax.
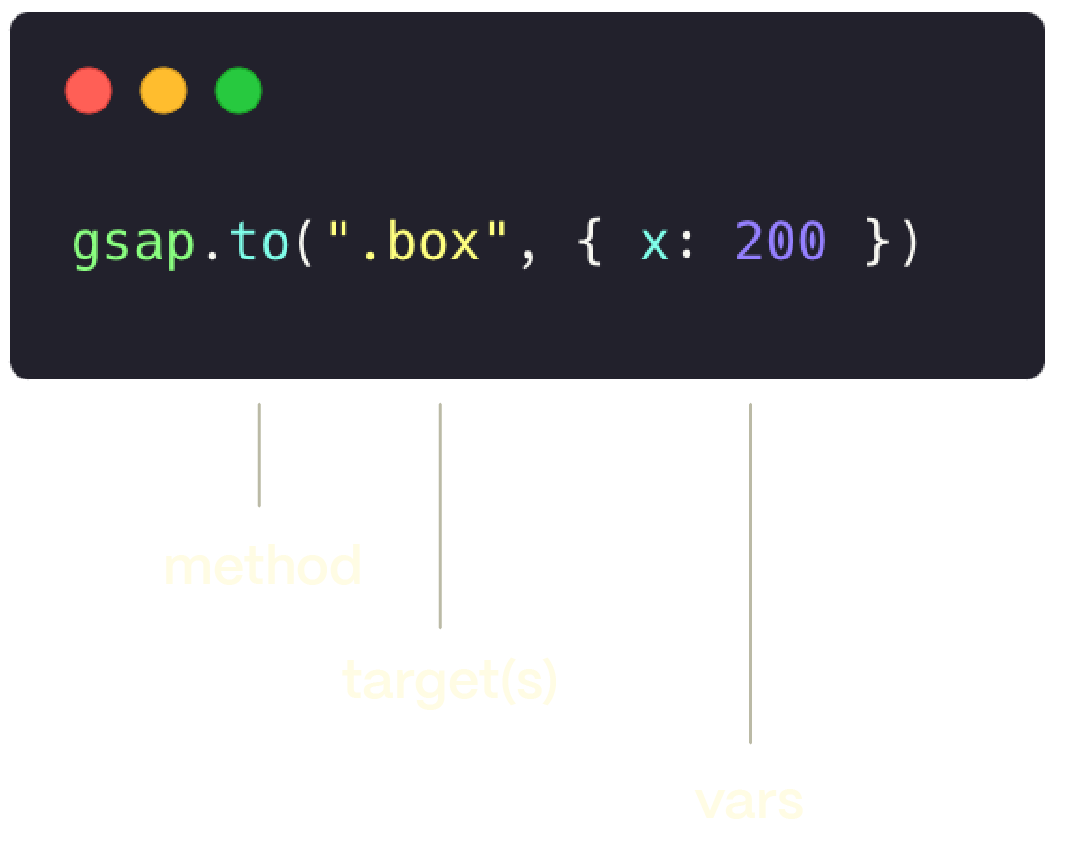
We've got a method, a target and a vars object which all contain information about the animation
The method(s)
There are four types of tweens:
gsap.to() - This is the most common type of tween. A .to() tween will start at the element's current state and animate "to" the values defined in the tween.
gsap.from() - Like a backwards .to() where it animates "from" the values defined in the tween and ends at the element's current state.
gsap.fromTo() - You define both the starting and ending values.
gsap.set() Immediately sets properties (no animation). It's essentially a zero-duration .to() tween.
Let's look at them in action!
loading...
The target (or targets)
Next up we have to tell GSAP what we want to animate. Under the hood GSAP uses document.querySelectorAll(), so for HTML or SVG targets we can use selector text like ".class" and "#id". Or you can pass in a variable or even an Array.
// use a class or ID
gsap.to(".box", { x: 200 });

// a complex CSS selector
gsap.to("section > .box", { x: 200 });

// a variable
let box = document.querySelector(".box");
gsap.to(box, { x: 200 })

// or even an Array of elements
let square = document.querySelector(".square");
let circle = document.querySelector(".circle");

gsap.to([square, circle], { x: 200 })
The variables
The vars object contains all the information about the animation. These can be arbitrary properties you want to animate, or special properties that influence the behavior of the animation - like duration, onComplete or repeat.
gsap.to(target, {
  // this is the vars object
  // it contains properties to animate
  x: 200,
  rotation: 360,
  // and special properties
  duration: 2
})
So what properties can I animate?
GSAP can animate almost anything, there is no pre-determined list. This includes CSS properties, custom object properties, even CSS variables and complex strings! The most commonly animated properties are transforms and opacity.
Transforms are a web animator's best friend. They can be used to move your elements around, scale them up and spin them around. Transforms and opacity are also very performant because they don't affect layout, so it's less work for the browser.
When possible, use transforms and opacity for animation rather than layout properties like "top", "left" or "margin". You'll get smoother animations!
Transform shorthand
You may be familiar with transforms from CSS:
transform: rotate(360deg) translateX(10px) translateY(50%);
GSAP provides a shorthand for transforms. The previous line of CSS would be written like so.
{ rotation: 360, x: 10, yPercent: 50 }
Here's a list of the shorthand transforms and some other commonly used properties.
| GSAP | Description or equivalent CSS |
|---|---|
| x: 100 | transform: translateX(100px) |
| y: 100 | transform: translateY(100px) |
| xPercent: 50 | transform: translateX(50%) |
| yPercent: 50 | transform: translateY(50%) |
| scale: 2 | transform: scale(2) |
| scaleX: 2 | transform: scaleX(2) |
| scaleY: 2 | transform: scaleY(2) |
| rotation: 90 | transform: rotate(90deg) |
| rotation: "1.25rad" | Using Radians - no CSS alternative |
| skew: 30 | transform: skew(30deg) |
| skewX: 30 | transform: skewX(30deg) |
| skewY: "1.23rad" | Using Radians - no CSS alternative |
| transformOrigin: "center 40%" | transform-origin: center 40% |
| opacity: 0 | adjust the elements opacity |
| autoAlpha: 0 | shorthand for opacity & visibility |
| duration: 1 | animation-duration: 1s |
| repeat: -1 | animation-iteration-count: infinite |
| repeat: 2 | animation-iteration-count: 2 |
| delay: 2 | animation-delay: 2 |
| yoyo: true | animation-direction: alternate |
The best way to learn is by experimenting. This demo below is a live code playground, go ahead and tweak the values to make the box move!
loading...
By default GSAP will use px and degrees for transforms but you can use other units like, vw, radians or even do your own JS calculations or relative values!
x: 200, // use default of px
x: "+=200" // relative values
x: '40vw', // or pass in a string with a different unit for GSAP to parse
x: () => window.innerWidth / 2, // you can even use functional values to do a calculation!

rotation: 360 // use default of degrees
rotation: "1.25rad" // use radians
What else can I animate?
Pretty much anything - If you're not sure, give it a try! Can't figure it out? Pop over to the forums and we'll give you a hand.
CSS properties
Transforms, colors, padding, border radius, GSAP can animate it all! Just remember to camelCase the properties - e.g. background-color becomes backgroundColor.
loading...
Although GSAP can animate almost every CSS property, we recommend sticking to transforms and opacity when possible. Properties like filter and boxShadow are CPU-intensive for browsers to render. Animate with care and make sure to test on low-end devices.
SVG attributes
Just like HTML elements, SVG elements can be animated with transform shorthands. Additionally you can animate SVG attributes like width, height, fill, stroke, cx, opacity and even the SVG viewBox itself using an attr object.
loading...
Any numeric value, color, or complex string containing numbers
When we say anything we mean anything. GSAP doesn't even need DOM elements in order to animate properties. You can target literally any property of any object, even arbitrary ones you create like this:
//create an object
let obj = { myNum: 10, myColor: "red" };

gsap.to(obj, {
  myNum: 200,
  myColor: "blue",
  onUpdate: () => console.log(obj.myNum, obj.myColor)
});
Canvas
In the demo below we have a box drawn with HTML canvas. We're animating x and y values stored in a position object and then we update the canvas on each tick of the animation.
GSAP is often used this way to animate in Three.js, HTML canvas and Pixi.js:
loading...
Special Properties
To adjust how a tween behaves we can pass in some special properties. In fact, we've looked at one already - duration.
You can check them all out in our documentation, but here are some of most common ones.
| Property | Description |
|---|---|
| duration | Duration of animation (seconds) Default: 0.5 |
| delay | Amount of delay before the animation should begin (seconds) |
| repeat | How many times the animation should repeat. |
| yoyo | If true, every other repeat the tween will run in the opposite direction. (like a yoyo) Default: false |
| stagger | Time (in seconds) between the start of each target's animation (if multiple targets are provided) |
| ease | Controls the rate of change during the animation, like the motion's "personality" or feel. Default: "power1.out" |
| onComplete | A function that runs when the animation completes |
Let's look at some of these in more detail...
Repeats and alternating repeats
repeat does exactly what you might think - it allows you to play an animation more than once. repeat is often paired with yoyo in order to reverse the direction each cycle. Change the code to yoyo:false in the demo below to see the difference.
loading...
Do you want your animation to repeat infinitely? No problem! Use repeat: -1
Delays
You can delay the start of an animation by a certain number of seconds. You can also use repeatDelay to add a delay to the start of any repeat iterations.
loading...
So far so good. But... these animations aren't very exciting yet. Easing to the rescue!